Sunday, 31 October 2021

Create An OTO To Instantly Boost Sales


In the previous blog post, I shared my thoughts on the value of a customer list with you. Today I want to share a simple but oh-so powerful strategy with you to start taking advantage of the fact that your existing customers are your most valuable assets. To grow your bottom line, you only have a few options. You can cut expenses, you can get more customers, or you can increase how much money each customer spends with you. Getting customers to spend more with you without having to raise prices (and often lower conversion) is what the remainder of this 7-day series is all about. 


The hardest part of making money online is to get people to spend those first few dollars with you. Once they’ve done that, they are more likely to spend money with you again and again. One of the best times to get them to buy from you is right after they’ve made a purchase. That’s where one time offers or OTOs come in. 


The idea is to present your customer with a great deal on a complementary product as soon as they finish buying. This could be a bigger version of the same product (so if you sold them 10 blue widgets on the initial sale, offer them 50 more widgets at a great price), it could be something related (an offer for 10 yellow widgets to go with the blue ones), or something that helps them make better use of what they’ve bought (a book on how to install those blue widgets). 


The best place to start adding OTOs to your funnel is with your best-selling products. What’s making you the most consistent sales right now? Or maybe there’s something you’re thinking of launching in the next few weeks that could benefit from an upsell offer. It doesn’t matter if it’s a lower priced product. The volume of sales is more important than your actual profit on the initial offer, since customers won’t see the OTO unless they buy the first product. 


There are two reasons why one time offers work so well. The first is because people are already in a shopping mindset and comfortable buying from you. They just bought one of your products when they are presented with this upsell offer. The second reason is fear of missing out. The whole point of a “One Time Offer” is that it is only available “right now”. Once they leave the sales page, the opportunity to take you up on the offer is gone. This creates urgency and scarcity and with it the fear of missing out. Try it by creating an OTO for some of your best-selling products and see for yourself how much you can increase your bottom line by adding this to your overall sales funnel. 


Your Customers Make Up Your Most Valuable List


You’ve heard the phrase “the money is in the list”. In other words, your subscribers have value. Today I want to share one particular type of list with you that’s a lot more valuable than any other. That list is your customer list. These are the people that have spent money with you already. And guess what, they are the most likely to do so again and again and again. That’s what makes them one of your most valuable business assets. 


Over the course of the next seven days, we take a look at this sub-group of your subscribers, figure out how to get more of the, and I challenge you to look through your site, your emails, and your funnel and work on more opportunities to mail them regularly going forward. First though, let’s take a quick look at what makes these people so special to you and your bottom line. 


Customers are people that already trust you. If your product provides great value to them (which is should), they also like you. Over the course of consuming the product and being part of your funnel, they also get to know you better. In short, these are the people that know, like, and trust you the most when it comes to your business. This means that are more likely to buy something else you recommend. This could be your own product or something you’re promoting as an affiliate. 


When you mail an offer to your customer list, you can expect a much higher conversion than with any other list. With a regular offer, a 2% conversion of visitors to sales is often what you expect. When mailing to your list of subscribers, you can often double or even triple that conversion. With a customer list, you can expect to see conversions of 30% or higher depending on how targeted the product is. That’s a huge bump in conversion. It doesn’t take a lot of customers to make a food number of sales. That’s why this is the list you should work on growing the most. 


And the benefits don’t stop there. Customers are your most loyal audience. They are more likely to spread the word about you and defend you online. They aren’t afraid to sing your praises. Treat them well and you’ll have a steady supply of word-of-mouth advertising and testimonials to create valuable social proof. 


How do you get more customers? By adding a low-cost product to your funnel and constantly promoting it to the rest of your list. Make it your #1 goal to grow your customer list. Create something of value that relates to your opt-in offer and promote it on your “thank you page”, in your first few emails and occasionally throughout. Work on converting a portion of your email subscribers into customers right away. 


What can you do today to work on growing your very own customer list? 


Beyond The Sandwich – Mix It Up With Different Lunch Foods


When you think about packed school lunches, PB&J or ham and cheese sandwiches come to mind. While sandwiches certainly make for a nice school lunch, they are not your only option. Mix it up by fixing something different for your kids this school year. 


Make It A Wrap 


A quick and easy alternative to a sandwich is a wrap. Grab some tortillas and fix your child’s favourite sandwich as a wrap. Wraps are also great for adding lots of lettuce and extra veggies. Hummus and cucumbers make a delicious vegetarian lunch option. 


When you’re done adding your toppings, roll it up like a burrito and if desired, cut it in half. The wrap is good as is, or you can pack a small serving of salad dressing to dip. Ranch is always a favourite around here. Just make sure you pack it in a small, airtight container so your child doesn’t end up with ranch all over her lunch box (ask me know I know). 


Who Doesn’t Love Snack Food And Lunchables?


I have yet to meet a child that doesn’t love lunchables. But have you looked at the price of those found at the grocery store lately? Plus, I’m not the biggest fan of the food options. Why not make your own version instead with fresh ingredients and food you know your child will eat? Start with some sandwich meat and cheese cut into bite-sized pieces. Add some fresh raw veggies like sliced cucumber, cherry tomatoes, and baby carrots. Throw in some fresh or dried fruit and you have a delicious, healthy, homemade version. 


Of course, you can turn any of your child’s favourite snack foods including popcorn, trail mix, crackers, cheese, fruits and veggies and the likes into lunch. Grab a container with lots of little dividers (bento boxes are perfect) and fill them up with kid-friendly favorites. 


Healthy Salads For Lunch 


Salads are another great lunch option, particularly for older children. Get a container with a tight-fitting lid and add all your child’s favourite salad ingredients minus the dressing in there. 


Start with a bed of lettuce greens, add raw veggies, croutons, bacon bits, nuts and seeds and the likes. Top it with a source of protein like cheese, hard-boiled egg, ham or turkey, or even some grilled chicken. 


Pack dressing in a separate container along with a fork and napkin and lunch is done. You can assemble the salad the night before and store it in the fridge. The key is to make sure all your ingredients are very dry. If you’re washing your lettuce, use a salad spinner, or dry it on some paper towels before starting to pack it. Cutting everything into small bite-sized pieces will ensure that the lunch time salad is easy to eat. 


Get Creative With Bento Lunches


Have you heard of bento lunches and bento boxes? It’s a fun, fairly new trend in packed lunches that traces its origins to Japan. Bento is a traditional way for Japanese to pack single serve meals they can take with them to work or school. There they often consist of rice, fish or meat, and cooked or pickled vegetables. The container is usual rectangular with compartments for each dish. 


Bento boxes are traditional made of stainless steel, but you can also find plastic and even glass versions. These food containers with an international flair are usually square and have internal compartments that allows you to keep your food separate. This gives you a great canvas to get creative with food. 


Yes, with Bento boxes it’s ok to play with the food and come up with some fun and creative lunches for the kids (or yourself). Cut the sandwiches in cute little shapes, make some fun roll-ups, and get creative with fresh fruit, raw veggies, cheese and the likes as sides. 


If you are ready to get even more creative, do a quick search online for bento lunch ideas. You’ll find ideas from gourmet food to fun and quirky kid-friendly lunch ideas. Who knew that you could shape rice and make it look like an adorable panda? You’ll find entire Pinterest boards and Instagram accounts dedicated to creative bento boxes. 


Of course, there’s no need to go all out. You can make delicious and eye-pleasing bento lunches by taking just a little care with how you place the food in the boxes and taking advantage of simple little tricks like pouring gold fish crackers or raisins into paper or silicon cupcake liners. 


What I like best about bento lunches is that it gives you the opportunity to pack several small, snack like items into one lunch. Your child will have fun picking and choosing for lunch and you know he will still get a healthy meal. Plus, what child doesn’t love a bunch of colourful finger food for lunch. Heck, you may even convince your picky eaters to try new fruits, veggies, cheeses and the likes if you cut them into cute little shapes. 


Of course, these fun and delicious lunches aren’t just for kids. Order a couple of bento boxes and start packing your own lunch. You can go as simple or gourmet as you’d like. Or grab a few of your own favourite healthy snacks and call it lunch. The possibilities are almost endless with bento box lunches. 


Packing Hot Lunches For The First Cool Fall Days


After a long, hot summer, we all look forward to those first crisp fall days. And with it our menus change. Why not change the lunch you pack for your kids as well. Salads, wraps, and cold sandwiches are great late summer options, but when the temperatures start to drop, your little ones will appreciate a hot dish in their lunch box. 


Soup And A Hot Sandwich


One of my favourite school lunches as a kid was tomato soup and a grilled cheese sandwich. Who doesn’t love soup and a hot sandwich for lunch on a cool, crisp, fall day? If you thought those were outside your packed lunch capabilities, think again. All it takes is a small thermos, some aluminium foil and ideally an insulated lunch box. 


Make the soup the day before from scratch, or heat up some canned soup in the morning, right before school. Get it piping hot, and if possible, run some hot or even boiling water in the thermos first to get everything as warm as possible. Pour the soup in the thermos and sit it in the insulated lunch box. Don’t forget to pack a spoon. Lastly, make the hot sandwich. Grilled cheese, or grilled ham and cheese are always a favourite around here, as are any type of Panini. Fix the sandwich as usual and then wrap it in several layers of aluminium foil. If you’re worried about the bread getting soggy, wrap it in a paper towel first, then the foil. Keep the sandwich in the insulated lunch box and everything should be staying toasty warm for hours. Mix and match the soup and sandwich combos for endless portable lunch possibilities. 


Chili and Stew


Of course, you’re not limited to just soup. A nice hardy stew or a bowl of chili with some corn chips or a side of fresh cornbread make a nice addition to any lunch box. Make a batch of your favourite chili or stew and put it in your kids’ lunch boxes for the following days. 


Another great option is to freeze it in smaller portions and take them out as needed to add to lunch boxes. This is also a great time for you to take lunch to work or keep a bowl at home to reheat at lunch time. As with the soup we talked about earlier, you can get a short thermos, run hot water in it, and then fill it with the piping hot chili or stew. That will keep the lunch warm until well past lunch time. 


Leftovers Galore 


Last but not least, don’t forget about leftovers. They make for great lunch box additions. There are wide mouthed thermos out there that can hold a variety of leftover food from pasta dishes, to things like fried rice, or anything you can think of that would work well put in a bowl. 


If your child has access to a microwave, you can pack just about any leftover that can then be heated at school. Find a few microwave-safe plastic containers that work well and fit your child’s lunch box and you’re good to go.


Simple Tips To Get Organized And Make Fixing Lunches Easier


There is nothing worse than running late in the morning and then desperately trying to figure out something you can put in your children’s lunch boxes. If you find yourself flustered, or end up buying school lunch because packing it seems like too much of a hassle, take a look at the tips below. They will help you get organized so fixing lunches becomes quick and easy. 


Start With A List And Go Shopping 


Start by sitting down with your kids and come up with a list of lunches they like. This could include sandwiches and wraps, or even homemade lunch-able, but it doesn’t have to stop there. If you add a thermos to the mix, you can suddenly pack reheated leftovers, homemade soup and the likes. The key is to find lunch foods and snacks that your kids will eat that are also easy to pack. 


Make sure you have appropriate containers, and then head to the grocery store to pick up everything you need for the week. Don’t forget about snacks and drinks as needed. The list should make this much easier. Once you have several different lunch ideas your kids like and will actually eat, you can simply rotate through them and make the ingredients part of your weekly shopping trips. 


Prep What You Can As Soon As You Get Home 


When you get home from the store, keep lunch foods out and see what you can do to prep things ahead of time. Instead of putting that bag of grapes away, go ahead and wash and store them in little bags you can grab and toss in the lunch box. The same goes for things like carrots and even salads. Slice cheese as needed and just thing about what you can prep as soon as you get home. 


Pack Lunches The Night Before 


Mornings are busy and not always the perfect time to have to worry about packing lunches. Try making them the night before. Try packing them after dinner at night. Get the kids involved and have them help with lunch prep and clean-up after. You can store cold items in the fridge and have everything else sitting in the lunch box ready to go. It won’t take you long to get into a rhythm of preparing lunches while you’re cleaning up after dinner. You’ll appreciate this new habit in the mornings when all you need to do is grab a couple of things from the fridge and toss them in the lunch boxes. 


Get In The Habit Of Cleaning Lunch Boxes As Soon As The Kids Get Home


To make lunch prep even easier, get the kids into the habit of cleaning out their lunch box as soon as they get back from school. Even the youngest can help with this. Have them toss any uneaten food and bring the containers to the sink to be washed. Older children can easily clean their own containers, while you’ll probably have to do the washing for your youngest. Having everything clean and ready to go will make it easier to pack the new lunches later on in the day. 


Stick to these tips and it won’t take you long to get into an efficient lunch packing routine that will make it a snap. Don’t forget to get the kids involved and put them in charge of much of the preparations. Not only will this make your live easier in the long run, it will give them a sense of ownership over their lunch. 


How To Pack School Lunches That Your Kids Will Actually Eat


Summer is coming to an end and school is about to start. That of course means it’s time to get back into a school year routine. Part of that routine in many households is packing school lunches. Packed lunches are a great option when your child isn’t too fond of what the school has to offer or you want a little more control over what your child is eating. 


Of course, if your child has dietary restrictions or food allergies, packing lunches is a must. Frankly, packing a lunch allows you to include healthy foods your child will actually eat and it doesn’t have to cost any more than what you would be paying for lunch at school. 


Packing a lunch every day doesn’t do any good if your child doesn’t eat it or ends up trading most of it away for junk food. The key then is to find things that your child loves and enjoys eating. 


The best place to start is to get your child involved. Depending on the age of your kids, you could even put them in charge of making their own lunches. Not only do you know that they’ll pack something they will eat, being in charge of packing lunch will teach them responsibility. 


Start by talking to your kids about what they want in their lunch box. Make a list of options and then head to the store so you have everything you need for the first week of school. Getting the kids as involved as possible will make sure that they end up with lunches they will eat. For older kids that may mean making their own lunches (under your supervision of course). 


Younger children can help. Even your kindergartener can wash grapes and put them into a container, or pick a snack for his lunch box. Get in the habit of making lunches together the night before. Over time you can give the kids more and more responsibility for their lunches. This alone will help make sure they eat what they’ve packed. After all, it’s the lunch they made. Along the way you’re teaching them independence and important life skills. 


Finally, you want to encourage your kids to pack and eat healthy foods. Insisting on all healthy, organic food options all the time may not be your best strategy though. Strike a balance and make compromises. If your kids pack and eat a healthy wrap or salad for example, let them have some cookies for dessert. Teach them to make good choices, but don’t freak out if they decide to pack some Cheetos or a pack of Oreo cookies. Your goal is to get them to eat fairly healthy and make smart food choices, not restrict all access to junk food, causing them to trade with friends for forbidden Twinkies. 


Saturday, 30 October 2021

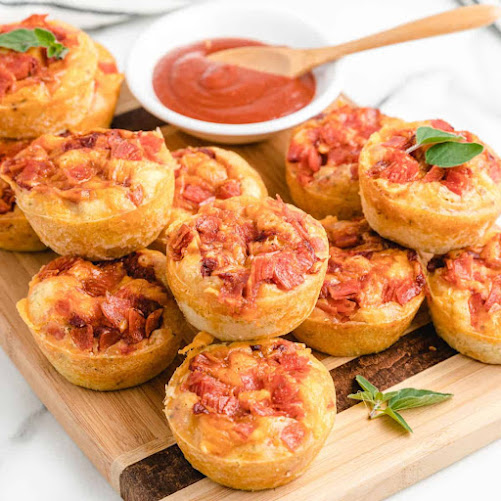
Pizza Muffins


Ingredients:


  • 2 Cups All-Purpose Flour
  • 1 Tbsp. Baking Powder
  • 1/2 tsp. Baking Soda
  • 1/4 Cup Sugar
  • 1 tsp. Each Salt and Dried Basil
  • 1 Cup Cheddar Cheese, cubed
  • 2 Eggs
  • 1 Cup Yogurt
  • 1/4 Cup Butter, melted
  • 1/4 Cup Pizza Sauce
  • 1/2 Cup Mozzarella, shredded


Directions:


Line 12 muffin cups with paper liners. In a large bowl, combine flour, baking powder, baking soda, sugar, salt, and basil. Stir in cheddar cubes.


In a medium bowl, whisk together eggs, yogurt and butter until smooth. Stir into flour mixture just until well combined and no dry spots remain. Add batter into muffin cups, dividing evenly. Spoon 1 tsp. pizza sauce on top of each muffin; sprinkle each with shredded mozzarella.


Bake at 400 F for 20 minutes or until golden and a toothpick inserted in center of one of middle muffins comes out clean. Let muffins cool in the pan for at least 5 minutes before removing, then let cool completely on a wire rack. (Freeze muffins in an airtight container for up to 1 month; defrost at room temperature.)


Sides:


  • Spinach salad with dressing
  • Fruit punch


Mini Calzones


Ingredients:


  • 1 Roll Your Favorite Biscuits 
  • 1/2 Ricotta Cheese 
  • 2 Cups Shredded Mozzarella
  • 2 tsps. Grated Parmesan Cheese
  • Dash Salt 
  • Dash Garlic Powder


Directions:


Open the biscuits and roll each one out flat with a rolling pin. If the dough sticks to the rolling pin take a little bit of flour and sprinkle over the rolling pin. 


For each biscuit add a 1/4 tsp. of Parmesan cheese onto one half of the flattened biscuit. Then add 3 Tbsps. of mozzarella and a tsp. of ricotta. Sprinkle with a little salt and garlic powder. Fold the biscuit over on itself. Crimp with a fork. 


Cook at 350F for 14-17 minutes or until the biscuit is golden brown. 


Sides:


  • Spaghetti sauce for dipping
  • Green salad with dressing
  • Iced tea


Ham & Mozzarella Sticks


Ingredients:


  • 4 Ham Slices
  • 2 String Cheese Sticks
  • 2 Green Olives
  • 2 Toothpicks


Directions:


Take two ham slices and wrap around one cheese stick. Add the olive to the seam and secure with the toothpick. 


Serves: 1


Sides:


  • Red Seedless Grapes
  • Mini Pretzels
  • 100% Real Juice Box